WordPress is a blog-publishing system written in PHP. You can use WordPress as a content management system (CMS) or to build your own websites on servers that support PHP and MySQL databases. This topic describes how to build WordPress website on Elastic Compute Service (ECS) instances that run different operating systems. You can use the manual or quick deployment method to build a WordPress website.
Build a WordPress website
Manual deployment
Prerequisites
The ECS instance on which you want to build a WordPress website is created and meets the following requirements:
The ECS instance is associated with a system-assigned public IP address or an elastic IP address (EIP). For more information, see Change the public IP address of an ECS instance.
An inbound rule is added to a security group of the instance to open required ports. For information about how to add an inbound security group rule, see Add a security group rule.
If the ECS instance is a Linux instance, ports 22, 80, and 443 are open.
If the ECS instance is a Windows instance, ports 80 and 3389 are open.
ImportantTo ensure server data security, only ports that are required to deploy and test the LNMP stack and the WordPress website are open. You can open other ports based on your business requirements. For example, if you want to connect to a MySQL database that is deployed on an ECS instance, you must add an inbound rule to a security group of the instance to open port 3306, which is the default port for MySQL.
Procedure
The operations that you must perform to build a WordPress website on an ECS instance may vary based on the operating system of the instance. Perform the operations that are supported by the operating system of the ECS instance.
Alibaba Cloud Linux 3, CentOS 7, and CentOS 8
Connect to an ECS instance.
For more information, see Connect to a Linux instance by using a password or key.
Deploy an LNMP stack.
For more information, see Deploy an LNMP stack on an Alibaba Cloud Linux 2, Alibaba Cloud Linux 3, CentOS 7, or CentOS 8 instance.
NoteYou may need to modify parameter settings based on the software version that you use. For information about the PHP versions required by different versions of WordPress, see PHP Compatibility and WordPress Versions.
(Conditionally required) If the ECS instance runs CentOS 8, change the CentOS 8 repository addresses.
NoteCentOS 8 reached EOL. In accordance with Linux community rules, all content was removed from the following CentOS 8 repository address: http://mirror.centos.org/centos/8/. If you continue to use the default CentOS 8 repository on Alibaba Cloud, an error is reported. To use specific installation packages of CentOS 8, change the CentOS 8 repository address. For more information, see Change CentOS 8 repository addresses .
Configure the WordPress database.
Log on to MySQL.
NoteUse the
rootuser and enter the password of the user to log on to MySQL. The password is the password you configured for MySQL when you built the stack.mysql -u root -pCreate a database named
wordpressfor the WordPress website that you want to build.create database wordpress;Create a user named
userto manage the wordpress database and set the password of the user toPASSword123.to increase data security.create user 'user'@'localhost' identified by 'PASSword123.';NoteYou can run the
show variables like "%password%";command to query all password-related system variables in the MySQL server.By default, the validate_password plug-in is installed in MySQL 5.7 and later to validate the strength of passwords. You can log on to MySQL to view the password strength rules.
Grant the user named user all permissions on the
wordpressdatabase.grant all privileges on wordpress.* to 'user'@'localhost';Apply the preceding settings.
flush privileges;Exit MySQL.
exit;
Download WordPress and save it to the root directory of the website that you want to build.
Alibaba Cloud Linux 3 and CentOS 8
Go to the root directory of the NGINX website and download the WordPress package.
cd /usr/share/nginx/html
sudo wget https://wordpress.org/wordpress-5.4.2.zip
(Optional) Install
unzip.sudo yum install unzip -yDecompress the WordPress package.
sudo unzip wordpress-5.4.2.zipCopy the content of the
wp-config-sample.phpfile in the WordPress installation directory to thewp-config.phpfile and use thewp-config-sample.phpfile as a backup.cd /usr/share/nginx/html/wordpress sudo cp wp-config-sample.php wp-config.php
CentOS 7
Download WordPress.
sudo yum -y install wordpressNoteRun the preceding yum command to download WordPress. The downloaded WordPress package is automatically saved in the
/usr/share/wordpressdirectory.Move the WordPress package to the root directory of the website that you want to build.
sudo mv /usr/share/wordpress /usr/share/nginx/html/wordpress
Modify the configuration file of WordPress.
(Conditionally required) If your ECS instance runs CentOS 7.x, perform this step.
Go to the new WordPress directory and create a symbolic link to the
wp-config.phpfile.cd /usr/share/nginx/html/wordpress sudo ln -snf /etc/wordpress/wp-config.php wp-config.phpModify the
wp-config.phpfile.sudo vim wp-config.phpPress the
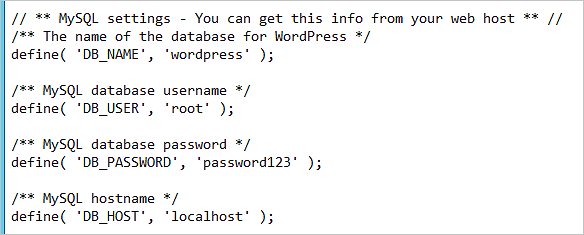
Ikey to enter Insert mode.Modify the MySQL-related settings based on the configured WordPress database by using the following code snippet:
// ** MySQL settings - Obtain the information from your host. ** // /** The name of the WordPress database */ define('DB_NAME', 'wordpress'); /** The username of the MySQL database */ define('DB_USER', 'user'); /** The password of the MySQL database */ define('DB_PASSWORD', 'PASSword123.'); /** The host of the MySQL database */ define('DB_HOST', 'localhost');NoteThe data of the WordPress website is stored by the user named
userin thewordpressdatabase.Press the
Esckey to exit Insert mode. Enter:wqand press theEnterkey to save and close the configuration file.
Modify the NGINX configuration file.
Alibaba Cloud Linux 3 and CentOS 7
Open the NGINX configuration file.
sudo vim /etc/nginx/nginx.confPress the
Ikey to enter Insert mode.NoteIn this example, the root directory is
/usr/share/nginx/html/wordpress.Within the
serverbraces, replace the content that followsrootwith the root directory of the WordPress website.Within the
location ~ .php$braces, replace the content that followsrootwith the root directory of the WordPress website.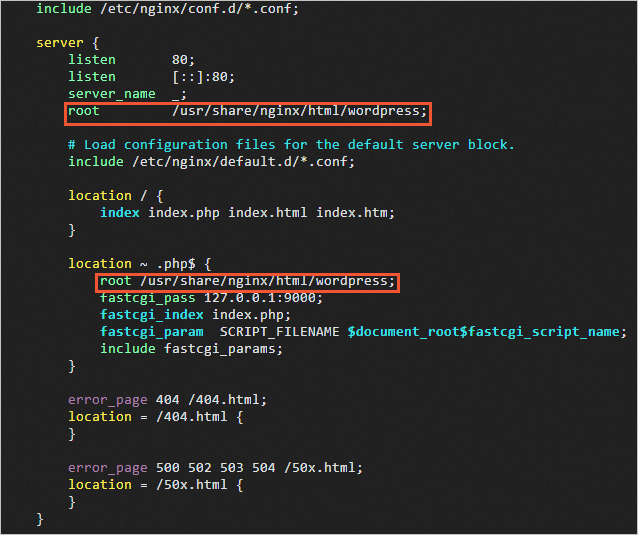
Press the
Esckey to exit Insert mode. Enter:wqand press theEnterkey to save and close the configuration file.Restart NGINX.
sudo systemctl restart nginx
CentOS 8
Open the NGINX configuration file.
sudo vi /etc/nginx/conf.d/default.confPress the
Ikey to enter Insert mode.NoteIn this example, the root directory is
/usr/share/nginx/html/wordpress.Within the
location /braces, replace the content that followsrootwith the root directory of the WordPress website.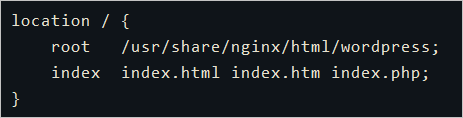
Within the
location ~ \.php$braces, replace the content that followsrootwith the root directory of the WordPress website.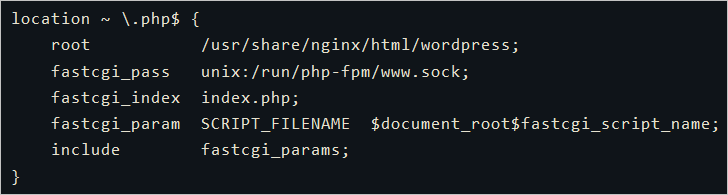
Press the
Esckey to exit Insert mode. Enter:wqand press theEnterkey to save and close the configuration file.Restart NGINX.
sudo systemctl restart nginx
Install WordPress and log on to the WordPress website.
On your on-premises machine, use a web browser to access
http://<Public IP address of the ECS instance>to go to the WordPress installation page.Configure basic information about the WordPress website and click Run the installation.
Configure the following parameters:
Site Title: the name of the WordPress website. Example: demowp.
Username: the username that you want to use to log on to WordPress. Make sure that your username is secure. Example: testwp.
Password: the password that you want to use to log on to WordPress. We recommend that you specify a strong password. Example: Wp.123456.
Your Email: the email address that you want to use to receive notifications. Example: username@example.com.
Click Install Wordpress.
Enter the
testwpusername and theWp.123456password that you specified when you installed WordPress, and click LOGIN.You are logged on to your WordPress website.
Windows Server 2012 R2
Make sure that a web environment is already deployed on the Windows instance on which you want to build a WordPress website.
Connect to the Windows instance and download the WordPress installation package.
Connect to an ECS instance.
For more information, see Connect to a Windows instance by using a password or key.
Download the WordPress installation package from the official WordPress website.
NoteIn this example, WordPress 5.3.2 is used. If you download WordPress on an instance that is located in a region inside the Chinese mainland and the
429 Too Many Requestserror is reported, we recommend that you try again or download the WordPress installation package from a third-party website.Decompress the WordPress installation package.
In this tutorial, the WordPress installation package is decompressed to the
C:\wordpressdirectory.
Create a MySQL database for the WordPress website that you want to build.
Go to the bin folder in the MySQL installation directory, right-click a blank area while you press and hold the
Shiftkey, and then select Open command window here.Log on to MySQL.
mysql -u root -pCreate a database named
wordpress.create database wordpress;
Configure WordPress.
In the
C:\wordpressdirectory, find thewp-config-sample.phpfile, copy the file, and then change the name of the file copy towp-config.php.Use the text editor to open the
wp-config.phpfile and modify information about thewordpressdatabase.The following figure shows an example.
Save the
wp-config.phpfile.
Add the WordPress website to Server Manager.
Find the Server Manager icon in the Windows taskbar and open Server Manager.
In the top navigation bar of the Server Manager window, choose .
In the Connections pane, choose .
Delete the website that is bound to port 80 or change the port number from 80 to an unused port number, such as 8080.
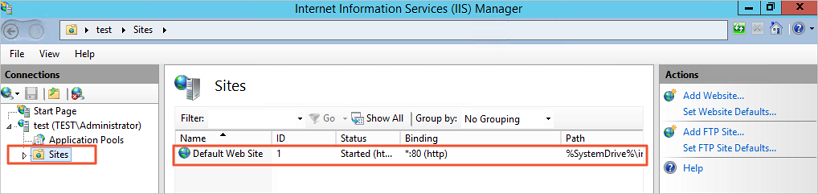
In the Actions pane to the right, click Add Website to add the WordPress website.
The following figure shows an example.
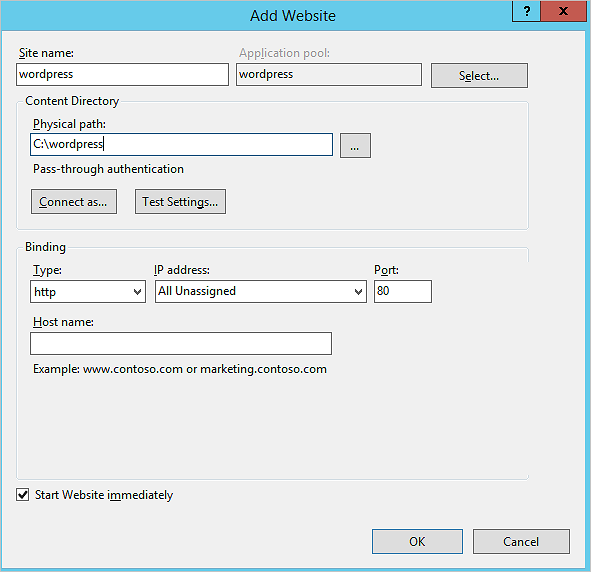
Take note of the following parameters:
Site name: Specify a name for the WordPress website. In this example, enter
wordpress.Application pool: Select DefaultAppPool.
Physical path: Select the directory where you decompressed the WordPress installation package. In this example, select
C:\wordpress.Port: Enter 80.
Install WordPress and log on to the WordPress website.
On the Windows instance, use a web browser to access
http://localhost/to go to the WordPress installation page.Configure basic information about the WordPress website and click Run the installation.
Configure the following parameters:
Site Title: the name of the WordPress website. Example: demowp.
Username: the username that you want to use to log on to WordPress. Make sure that the username is secure. Example: testwp.
Password: the password that you want to use to log on to WordPress. We recommend that you specify a strong password.
Your Email: the email address that you want to use to receive notifications. Example: example.com.
Click Install Wordpress.
Enter the username and password that you specified when you installed WordPress and click LOGIN.
You are logged on to the WordPress website.
Quick deployment (CentOS 7)
This section describes how to quickly build a WordPress website on an ECS instance. The procedure that is described in this section is suitable only for ECS instances that run CentOS 7.x.
Use ROS
Prerequisites
The ECS instance on which you want to build a WordPress website meets the following requirements:
The ECS instance is associated with a system-assigned public IP address or an elastic IP address (EIP). For more information, see Change the public IP address of an ECS instance.
An inbound rule is added to a security group of the instance to allow traffic on port 22, port 80, and port 443. For information about how to add an inbound security group rule, see Add a security group rule.
ImportantTo ensure server data security, only ports that are required to deploy and test the LNMP stack and the WordPress website are open. You can open other ports based on your business requirements. For example, if you want to connect to a MySQL database that is deployed on an ECS instance, you must add an inbound rule to a security group of the instance to open port 3306, which is the default port for MySQL.
Procedure
Alibaba Cloud Resource Orchestration Service (ROS) allows you to quickly deploy an LNMP stack and a WordPress website. Compared with the manual deployment method, the quick deployment method automates resource deployment and configuration.
Click here to go to the Create Stack page in the ROS console for quickly creating a stack that is used to deploy WordPress.
In the top navigation bar, select the region where the ECS instance is located.

In the Configure Parameters step, enter a name for the stack, create or select an ECS instance, and then enter a password for the MySQL database.
To create an ECS instance, specify a zone, instance type, system disk category, and password for the instance.
ImportantThe created ECS instance is a pay-as-you-go ECS instance that runs CentOS 7.x, uses the pay-by-traffic metering method for network usage, and has a public IP address. For information about billing of ECS instances and public IP addresses, see Billing overview.
Confirm that the specified information is correct and click Create.
If the value of the Status parameter changes from Creating to Created on the Stack Information tab, WordPress is deployed.
Install WordPress and log on to the WordPress website.
Click the Outputs tab and then click the URL
http://<Public IP address of the ECS instance>next to WordPressUrl.Configure basic information about the WordPress website and click Run the installation.
Configure the following parameters:
Site Title: the name of the WordPress website. Example: demowp.
Username: the username that you want to use to log on to WordPress. Make sure that your username is secure. Example: testwp.
Password: the password that you want to use to log on to WordPress. We recommend that you specify a strong password. Example: Wp.123456.
Your Email: the email address that you want to use to receive notifications. Example: username@example.com.
Click Install Wordpress.
Enter the
testwpusername and theWp.123456password that you specified when you installed WordPress, and click LOGIN.You are logged on to your WordPress website.
Resolve the domain name of the WordPress website
If you allow users to access the WordPress website by using the public IP address of the ECS instance, the security of the instance is compromised. If you have a domain name or want to register a domain name for the WordPress website, perform the following steps:
Register a domain name.
For more information, see How to register a domain name on Alibaba Cloud.
Apply for an Internet Content Provider (ICP) filing for the domain name.
If the WordPress website is hosted on an ECS instance that is located in a region inside the Chinese mainland, apply for an ICP filing. For more information, see ICP filing application overview.
Resolve the registered domain name to the public IP address of the ECS instance.
Domain name resolution is a prerequisite if you want to use domain names to access your website. For more information, see Get started with Alibaba Cloud DNS.
Replace the public IP address of the ECS instance with the registered domain name.
Connect to the ECS instance on which the WordPress website is hosted.
For more information, see Connection method overview.
(Conditionally required) If the ECS instance runs Windows, perform this step.
Return to the ECS instance on which the WordPress website is hosted. Go to the bin folder in the MySQL installation directory, right-click a blank area while you press and hold the
Shiftkey, and then select Open command window here.Log on to MySQL.
mysql -u root -pSwitch to the WordPress database.
use wordpress;Configure the registered domain name for the WordPress website.
NoteIn this example, the registered new domain name is
www.example.com.Linux instance:
Replace the public IP address of the ECS instance with the registered domain name.
update wp_options set option_value = replace(option_value, 'http://<Public IP address of the instance>', 'http://www.example.com') where option_name = 'home' OR option_name = 'siteurl';Windows instance:
Replace
http://localhost/with the registered domain name.update wp_options set option_value = replace(option_value, 'http://localhost', 'http://www.example.com') where option_name = 'home' OR option_name = 'siteurl';
Exit MySQL.
exit;The registered domain name is configured for your WordPress website.
FAQ
Why am I unable to access a fixed URL after I specify the URL in WordPress?
You can make a website static to help search engines index the website. Before you specify a fixed URL for a WordPress website, configure static rules in the NGINX server. Perform the following steps:
Log on to the ECS instance on which the WordPress website is hosted.
For more information, see Connect to a Linux instance by using a password or key.
Open the NGINX configuration file.
sudo vim /etc/nginx/nginx.confPress the
Ikey to enter Insert mode.Within the
location /code braces, add the following code snippet:if (-f $request_filename/index.html){ rewrite (.*) $1/index.html break; } if (-f $request_filename/index.php){ rewrite (.*) $1/index.php; } if (!-f $request_filename){ rewrite (.*) /index.php; }Press the
Esckey to exit Insert mode. Enter:wqand press theEnterkey to save and close the configuration file.Restart NGINX.
sudo systemctl restart nginx
Why am I prompted for FTP logon credentials or that the directory cannot be created when I attempt to update the version of or upload a theme or plug-in in WordPress?
You may not have the permissions to configure themes or plug-ins in the WordPress configuration file. To resolve the issue, perform the following steps:
Log on to the ECS instance on which the WordPress website is hosted.
For more information, see Connect to a Linux instance by using a password or key.
Open the WordPress configuration file.
sudo vim /usr/share/nginx/html/wordpress/wp-config.phpPress the
Ikey to enter Insert mode.Append the following code snippet to the end of the file:
define("FS_METHOD","direct");
define("FS_CHMOD_DIR", 0777);
define("FS_CHMOD_FILE", 0777);
Press the
Esckey to exit Insert mode. Enter:wqand press theEnterkey to save and close the configuration file.Return to the WordPress dashboard and refresh the page. Check whether the FTP logon credential issue is solved.
If the directory cannot be created, run the following command on the ECS instance to switch the user who has permissions on the website root directory to the NGINX user. In this example, the
nginxuser is used.sudo chown -R nginx /usr/share/nginx/html/wordpress
How do I change the default username and password of the MySQL 5.7 database in a WordPress image?
Perform the following steps:
Connect to the ECS instance that uses the WordPress image.
For more information, see Connect to a Linux instance by using a password or key.
Log on to MySQL.
mysql -u root -pEnter the default password
mysql57@onesul.comof the root user of MySQL as prompted.[test@izbp1cgfkqcrs8pi2li**** ~]# mysql -u root -p Enter password: Welcome to the MySQL monitor. Commands end with ; or \g. Your MySQL connection id is 3 Server version: 5.7.23 MySQL Community Server (GPL) Copyright (c) 2000, 2018, Oracle and/or its affiliates. All rights reserved. Oracle is a registered trademark of Oracle Corporation and/or its affiliates. Other names may be trademarks of their respective owners. Type 'help;' or '\h' for help. Type '\c' to clear the current input statement. mysql>Log on to the MySQL database.
use mysqlNoteTo view the username of the MySQL database, run the
select user from mysql.user;command.Change the default username and password of the MySQL database based on your business requirements.
Change the default username of the MySQL database.
update user set user="<New username>" where user="<Username>";In this example, run the following command to change the default username from
roottoadmin:update mysql.user set user="admin" where user="root";Change the password of the default username.
update mysql.user set authentication_string=password("<New password>") where user="<Username whose password you want to change>";In this example, run the following command to change the password of the
rootusername tonewpassword:update mysql.user set authentication_string=password("newpassword") where user="root";
Reload the privilege tables and apply the changes.
flush privileges;Exit MySQL.
quit;